Showing posts with label recipe. Show all posts

22 May 2015

Quick and Easy Vegetable Pasta (GF+Vegan)


This pasta dish is one of the quickest and easiest things to make. It's perfect for those nights when I get in late and can't really be bothered to cook. Sometimes even, it's just something I fancy. Probably because pasta is a bit of a comfort food and this is a very wholesome meal which is also pretty healthy! Feel free to change the vegetables I have used for what you have on hand. It's great way of using things up - mushrooms are an especially nice addition to this recipe.

Serves 2

You will need:
130g Pasta (I used brown rice pasta, but use any of your choice)
1 tbsp of Olive Oil
½ Onion
½ Red Pepper
½ Courgette
1 Clove of Garlic
1 Can Chopped Tomatoes
1 tbsp Tomato Puree
A large pinch of Oregano
3 Chunks/Pieces of Frozen Spinach 

Method:
  1.  Start by heating the oil in a saucepan to a medium heat. Dice the onion and add to the pan. Then cut the red pepper and courgette into chunks and add them to the pan also. Cook for a few minutes, or until the onions have softened.
  2. Crush or finely chop the garlic and add to the pan, cooking for a further 1 minute. Add the tomatoes, tomato puree and oregano. Stir everything to mix well. Simmer for 20 minutes.
  3. Halfway through the cooking time, cook you pasta according to the packet instructions and add the frozen spinach to the sauce. 
  4. Once the pasta has been drained, add to the sauce. Stir through to mix and serve immediately.

6 February 2015

Amazing Guacamole!


Up until recently I thought guacamole was a safe choice when looking for a healthy snack food at the supermarket. Little did I know that most shop brought guacamole's contain double cream. Not only is double cream high in saturated fats, but when trying to cut dairy out of my diet it was one of the least suspected places to find it. Using the recipe out of Deliciously Ella's new book as a guide, also on her blog here, I made my own guacamole for the first time. I was amazed at how simple, easy and, most importantly, delicious it was! I didn't have any fresh coriander on hand, so feel free to add some if you do.

To serve 1

You will need:
1 Ripe Avocado
3 Small Tomatoes 
1 Lime
1 Small Clove of Garlic
½ A Small Jalapeno Pepper
A little Salt

Method: 
1. Scoop out the flesh of the avocado into a bowl, removing the stone. Mash the avocado using a fork until only small chunks remain. Squeeze the juice from the lime into the bowl and mix in.
2. Remove the seeds from the tomatoes and cut into small pieces. Do the same with the jalapeno pepper and crush the garlic clove. Add these to the bowl, along with a pinch of salt and mix everything together. 
Enjoy!

26 November 2014

Pecan Blondies


I have a bit of an obsession with white chocolate. These have the flavour of white chocolate melted into a cake giving them a buttery, smooth taste. Nuts and white chocolate is a well known food combination, and rightly so. These are simply delicious. They may even be better than brownies!

Makes 16 squares

You will need:

175g White Chocolate
115g Unsalted Butter
100g Caster Sugar
2 Medium Eggs
½ tsp Vanilla Extract
125g Plain Flour
½ tsp Baking Powder
150g Pecan Halves

Method:

1. Pre-heat the oven to 180 C and prepare a 20cm square non-stick cake tin, greased and base-lined with greaseproof paper. Break up the chocolate and put it into a heatproof bowl with the butter. Put the bowl over a pan of of hot water and melt gently while stirring frequently.When the chocolate is nearly all melted, remove the from the pan and stir until smooth.
2. Stir in the sugar, and leave to cool for 2 minutes. (Don't worry if the mixture looks curdled at this stage.)
3. Put the eggs and vanilla into a separate bowl and whisk until frothy. Add to the chocolate mixture and stir well.
4. Sift in the flour with the baking powder and stir. Add 100g of the pecan halves and mix in.
5. Transfer the mixture into the prepared tin and spread out evenly. Scatter the remaining pecan halves over the top. Bake in the oven for 20-25 minutes or until a skewer inserted halfway between the centre and the side of the cake comes out clean.
6. Leave to cool (if you can resist!), before removing the cake from the tin and cutting into squares.

14 October 2014

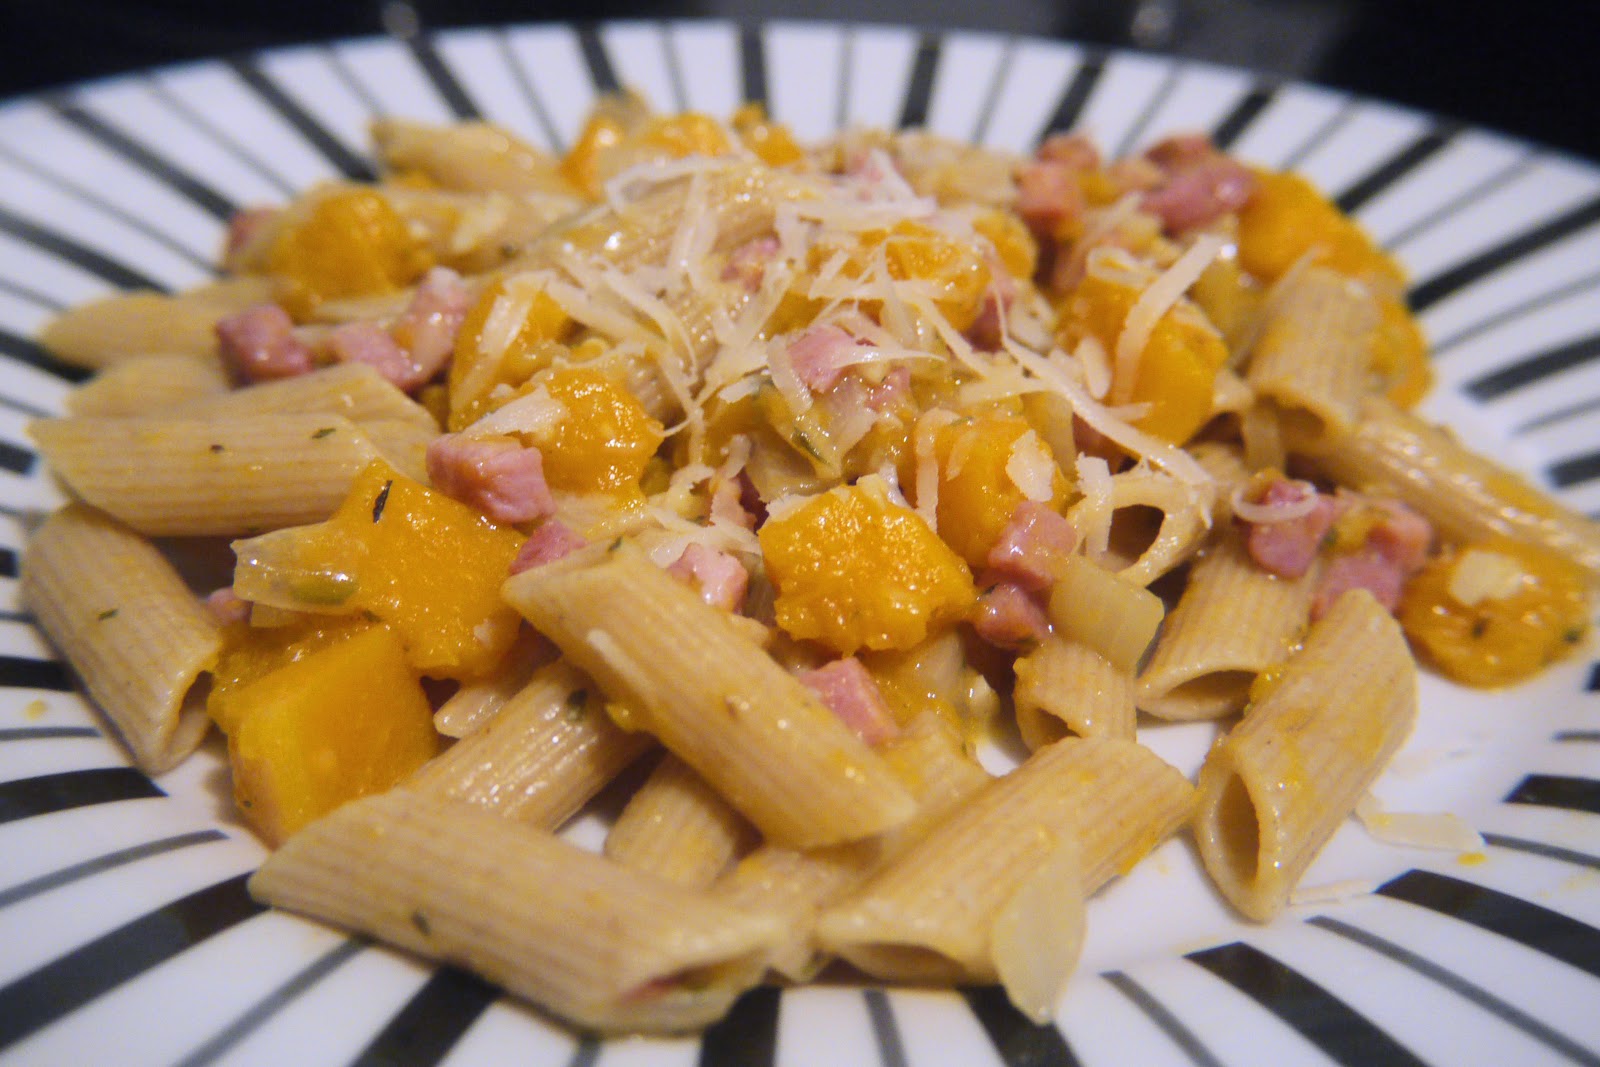
Butternut Squash and Pancetta Pasta


This has become another one of my favourite past dishes. It is so simple to make, yet so flavourful. I love the slightly sweet flavour of the butternut squash along with the salty flavour of the pancetta.

Serves 3

You will need:

225g Penne Pasta ½ Butternut Squash (Peeled and diced)
1 Small Onion (Diced)
155g Pancetta (or diced bacon)
1 tbsp Olive Oil
1 Clove of Garlic (Crushed)
½ tsp Dried Mixed Herbs
⅔ Cup of Chicken Stock
¼ Cup of Grated Parmesan Cheese

Method:

  1. In a medium sized saucepan, add the olive oil and pre-heat over a medium. Add the pancetta and cook until it just starts to become crispy. Remove from the pan and set aside.
  2. In the same saucepan, add the onion and butternut squash. Season lightly and cook for 12-15 minutes or until they start to develop some colour. Add the garlic and cook for 1 more minute.
  3. Add the herbs and the chicken stock. Cook for 15-18 minutes or until the butternut squash becomes tender.
  4. Meanwhile, cook the pasta according to the package instructions. 
  5. Add the pasta to the saucepan along with the cheese and cooked pancetta. Stir until fully mixed and serve immediately.


21 September 2014

Goat's Cheese and Red Onion Filo Parcels


These were a bit of an experiment but turned out well. When doing our weekly food shop we saw something similar in the supermarket and thought we would try to recreate them at home. Using online recipes for guidance we came up with these. I think they would be perfect at a party as buffet food or canapés.

The picture above has still got some flour on the outside from the filo pastry. They still tasted good, but it might improve them if the melted butter was brushed on the outside of them before they were cooked. Here's a photo to show how delicious the filling was!


Makes 10

Ingredients:

1 pack Ready-Made Filo Pastry
125g Goat's Cheese
3 Red Onions
25g Walnuts (chopped)
2tbsp Butter
2tbsp Butter (melted)

Method:

1. Peel the onions and finely slice them into half-moon shapes. Add the 2 tbsp of butter to a frying pan on a medium heat. Once melted add the onions and cook for 45mins to 1 hour, or until the onions have started to caramelise and have reduced in size, stirring occasionally. Take off the heat.
2. Cut the goat's cheese into 10 chunks. 
3. Cut each filo sheet into 6 rough squares. Using a non-stick baking tray, start to prepare the filo parcels. Lay a square of filo pastry on the baking tray. Using a pastry brush (or your fingers if you don't have one), brush the top of the filo square with the melted butter. Place the next filo square on top at an angle to the first one. Again, brush the top with butter. Place another filo square on top, brush with butter and place the final square on top. You should have 4 layers of filo pastry, which each have been rotated slightly so they are at different angles.
4. Brush the melted butter around the edge of the layered filo in a circle. Place a small amount of the onions in the centre, then place a chunk of goats cheese on top and finally adding some of the chopped nuts.
5. Gather the edges of the filo pastry up around the filling, pressing them together to seal the parcel.
6. Repeat until you have run out of filo pastry and filling. Should make around 10 parcels. When you have finished preparing them, spread them out on the baking tray.
7. Bake in a pre-heated oven at 180 C for 10-15 minutes, or until they are becoming golden on the top and slightly around the outside.

24 August 2014

Banana Pancakes


I have seen a lot of recipes for healthier versions of pancakes around the internet, specifically Pinterest. The healthiest of them all seems to be those made with just eggs and banana. I am a bit sceptical of how these would resemble pancakes and whether they would taste good, so I found something which would look and taste more like a traditional pancake. I didn't see how I would achieve a pancake mixture without at least a small amount of flour, and I only make this occasionally either when I want a more special breakfast or when I have ripe bananas to use up. They taste really good and are fluffy on the inside. Great served with fruit and a little maple syrup. Best thing is how quick and easy they are to make, perfect for breakfast!

Makes 6 and Serves 2-3 people

You will need:
½ Cup of Plain Flour
1½ tsp Granulated Sugar (Optional)
1 tsp Baking Powder
Pinch of Salt
½ a beaten Egg
½ Cup of Milk (any kind will work, I used Almond Milk)
1 tbsp Vegetable Oil
1 ripe Banana, mashed
¼ tsp Cinnamon
¼ tsp Vanilla Extract  

Method:

1. Mix all the dry ingredients in medium sized bowl, and mix all the wet ingredients in a jug.
2. Pour the wet mixture into the bowl with the dry ingredients. Whisk until combined and the mixture is smooth. 
3. Heat a frying pan up to a medium heat. Use a ladle or ⅓ cup measure to spoon some mixture into the pan. Cook for a few minutes on each side or until starting to brown a little. 

Enjoy with any of your favourite pancake toppings.

4 March 2014

Sweet Potato Curry


This creation was something my Mum and her partner made when they came to stay with us last September, and I've recreated it a few times since. The simplicity of this recipe is down to the number of steps it takes to make. It contains no dairy and can be vegetarian if the prawns are left out or replaced with an alternative.

Serves: 4-6 people

You will need:
1 tbsp vegetable oil
1 onion (diced)
1 red pepper (diced)
2-3 tbsp curry paste
1 can chopped tomatoes
1 can coconut cream
1 large/medium or 2 small sweet potatoes (diced)
250-300g bag of frozen prawns (defrosted)

Method: 

1. Heat the vegetable oil in a saucepan pan. Add the onions and fry until softened. Mix in the curry paste and the red pepper and continue to fry for a couple more minutes.
2. Add the chopped tomatoes, coconut milk and sweet potato to the saucepan. Bring to a boil and gently simmer for 20 minutes, or until the sweet potato is tender.
3. Add the prawns to the curry and continue to cook until the prawns have heated up, but no longer as they are already cooked. Serve with rice.

note: this recipe works using either coconut milk or cream, although I do prefer the thicker, slightly richer sauce created using coconut cream. So I would recommend, if you can find it, using coconut cream as a preference.

24 November 2013

Pumpkin Pie


Before making this pumpkin pie I had never even tasted it. I wanted to make it purely to try it, and it turned out I really like it. Pumpkin pie is very popular in America but in this country it seems very few people have tried it. When asked what it tasted like I've described it as a cross between an egg custard tart and carrot cake...sounds strange, but trust me when I say it's good and you should at least try it! It is a very seasonal treat for Autumn and especially around Halloween when we see so many pumpkins around. If you don't go to the effort of making your own shortcrust pastry, this is very quick and easy to put together.

You will need:

400g Ready-made Shortcrust Pastry
425g Tin of Pumpkin Puree
340g Evaporated Milk
2 Eggs
¾ cup Granulated Sugar
1 ½ tsp Cinnamon
¾ tsp Ground Ginger
⅜ tsp Ground Nutmeg
⅜ tsp Ground Allspice

Method:

Preheat your oven to 220 C. Start by lightly greasing a 9-inch tart tin. Dust flour over a clean work surface and roll out the pastry in a circular shape until it is about half a cm thick. Wrap the sheet of pastry around your rolling pin and use it to lift the pastry onto the tin. Lower the pastry into the sides of the tin without stretching it and lightly press into the corners. Trim any excess pastry off leaving about 2 cm around the edge. Fold the edge back on itself. Using a fork, carefully prick the pastry on the base of the tin.
In a large mixing bowl measure out all of the remaining ingredients. Using a hand or electric whisk, mix all the ingredients together. Pour the mixture into the pastry lined tin, leaving about cm gap at the top of the pastry. (I had a small amount of pastry and a small amount of filling left, so if you have a small tartlet tin you can make a mini pie with the leftover.)
Put the pie into the oven. After 15 minutes turn the temperature down to 175 C. Leave the pie in the oven for a further 50-55 minutes. The filling should still be wobbly when it is done. Take it out of the oven and leave to cool completely before taking it out of the tin. Store in the fridge, as it is best eaten chilled.


9 September 2013

Baklava


You will need :

About 4 Ready-Made Filo Pastry Sheets
65g Pistashio Kernels
65g Walnuts
40g Soft Light Brown Sugar

 ½ tsp Ground Cinnamon 
¼ tsp Ground Nutmeg

For the syrup:  
225g Granlulated Sugar
150ml Water
Juice and Zest of 1/2 an Orange

Method:

Chop the nuts up to a coarse texture. (I did this by putting them in a plastic food bag and using a large knife to chop them, although it would be easier to use a food processor if you have one.)
In a bowl, mix the nuts with the brown sugar, cinnamon, and nutmeg.
Cut the filo pastry into rectangles about 20cm x 25cm (or a similar area to fit the baking tray you are using). Lay the first piece on a baking tray. Brush with melted butter before placing the next piece on top. Repeat until you have 4 layers of filo pastry. Spread the nut mixture over the filo base. Cover with a piece of filo pastry, and brush with the melted butter. Repeat until the top layer has 6 layers of filo pastry. Make sure the top is well brushed with melted butter and then cut a diamond pattern through the top layer of pastry. Bake in a preheated oven at 180 C for 20-25 mins or until the top is golden in colour.

Meanwhile, prepare the syrup. Put the sugar, water orange juice and zest into a saucepan. Heat gently while stirring until all the sugar has dissolved. Continue to simmer until the mixture becomes thicker in consistency, much like a runny syrup (it will become more syrup like when it cools down). This may take up to 20 minutes.

Let the baklava cool for 5 minutes after taking it out of the oven and then pour the syrup over the top, making sure to cover it evenly. Leave until it has completely cooled down before cutting into individual pieces.

1 September 2013

Brownie Cheesecake Bites


Makes 14

You will need:

225g Unsalted Butter
100g Dark Chocolate (broken into small pieces)
2 Eggs
225g Caster Sugar
½ tsp Vanilla Extract
Pinch of Salt
1 tbsp Cocoa Powder
100g Plain Flour

For the cheesecake topping:
85g Cream Cheese
1 Egg Yolk
1 ½ tbsp Caster Sugar

Method:

Prepare a cupcake tray with 14 cupcake cases and preheat the oven to 180 C.
Place the butter and the chocolate into a microwaveable bowl and put in the microwave for 30 seconds. Stir well and replace in the microwave for short periods of time, stirring in between, until the chocolate has just melted completely.
In a seperate bowl, beat together the eggs and sugar using a manual or electric whisk.
Slowly mix the melted chocolate into the sugar and eggs mixture. Finally add the salt, cocoa powder and flour and stir until it is all combined.
Divide the mixture between the 14 cupcake cases.
Beat the egg yolk, sugar and cream cheese together. Divide this mixture between the cupcake cases placing a small spoonful on the top of each.
Bake in the oven for about 20 minutes.

29 April 2012

Baking: Wholemeal Muffins


I was looking for something I could eat for breakfast when I get to college, that was fairly healthy and easy to eat. I've started making these recently and take one every morning to eat at college as I leave the house at 7 and don't have time to eat breakfast at home.

Recipe:

Makes 12
Cooking time: 20 minutes

Ingredients:
375g wholemeal self-raising flour
75g demerara sugar
2 eggs (lightly beaten)
75g of butter (melted)
315ml buttermilk*

* This is what was stated in the recipe I used but I use less than this as the buttermilk comes in a 284ml carton and so I use this amount.

1. Preheat the oven to 210°C (415°F/Gas 6-7). Lightly grease a 12 hole muffin tray.


 2. Add the flour and sugar to a mixing bowl.


3. Stir well, making a well in the center.


4. Melt the butter in a bowl. This can be done by putting it on the microwave for 1 min.


5. Add the buttermilk and mix together.


6. Lightly beat the eggs in a bowl.


7. Add the buttermilk, butter and eggs into the well in the mixing bowl.


8. Mix until all the ingredient are combined and it resembles a dough consistency. Don't worry of it looks lumpy.


9. Spoon the mixture into the muffin holes.


10. Bake in the oven for about 20 mins, or until starting to brown on top.


11. When cool enough to touch, lift the muffins out and put them on a cooling rack.


Ready to eat! You could also freeze these to keep for longer, and take them out when you need them. And although these look quite boring they do have a hint of sweetness to them so taste good!